

Hack What You Want For Making Music
Meet Launchpad, r_cycle, & Pd
Words: Peter Kirn
The Launchpad platform has always been conducive to the hack mentality — since v1, launched in 2009, the eight-by-eight grid has been a blank canvas for experimental creators. The latest MK3 version of the Launchpad family is no different and, in combination with some free software tools, you can be using Launchpad for live-coding performances, customising your music making setup, or hacking… well, anything, really!
In this piece, we’ll cover how to get started with Pure Data (Pd) and in particular, a set of tools built in Pd called r_cycle, with which you can extend your software patches into the hardware world, for bi-directional performance with the Launchpad grid, buttons, and lights. All the software is free and there’s a huge network of fellow hackers and creators online sharing their experiments. You can discover what they’ve discovered - the joy of transforming your music gear with your own ideas.
Musical possibilities: r_cycle and Launchpad in action
Web creators and software designers can create interfaces with a playset of tools, so why not musical creators, too? The idea of r_cycle is to give you easy access to creating interface elements on the Launchpad — triggers, sequencers, buttons, faders, and more — and then combining them with the capabilities of your computer. It’s built entirely in Pure Data and runs in that environment natively; it’s a set of patches you can incorporate into your own software, or even modify if you choose. Since Pd works with macOS, Windows, Linux, and even embedded platforms like Raspberry Pi, you can quickly make your own instruments.
The musical applications are basically limitless, but to get you started r_cycle already includes some synths, effects, pattern tools and sequencers, and sample and granular players. Pd lets you combine those elements or build more of your own.
That opens up a lot of live performance features. Want a drum sequencer that works in a really particular way? Got an idea for a wild bass line or solo instrument with custom tuning? Now you can make that with just the Launchpad and free software. Alternatively, if you are curious about exploring live coding and custom patching, you’re no longer restricted to using the keyboard and screen – you can play an expressive grid, too, and you don’t necessarily have to keep your eyes glued to the screen.
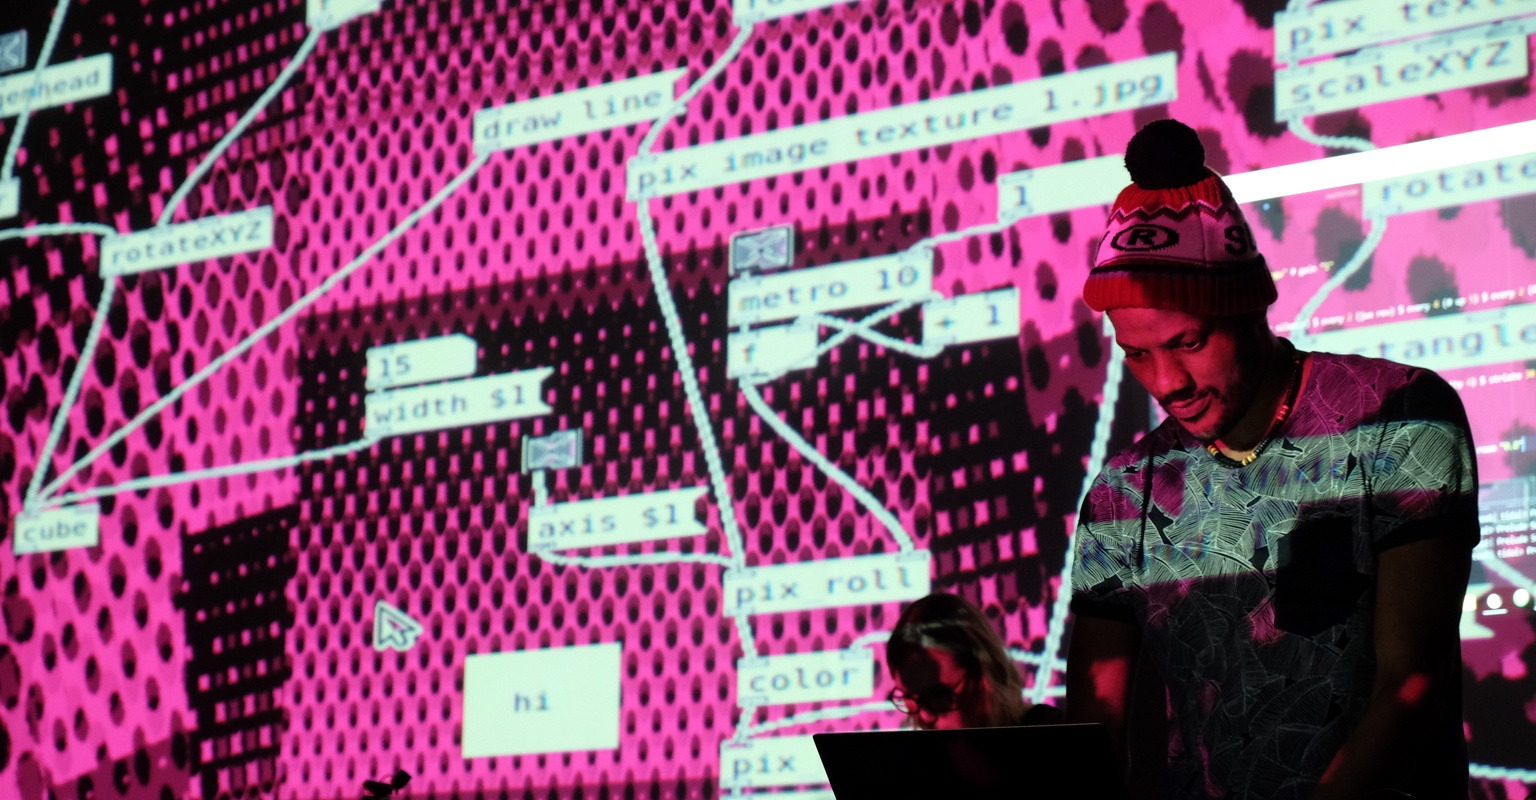
Antonio Roberts mid-performance. Photo: Marcin Sz.
One example: Antonio Roberts uses r_cycle and Launchpad to play with his partner Maria Witek. He uses his Launchpad X as a four-track step sequencer, triggering drum parts (kick, snare, clap, high hat), with additional layouts for controlling sound parameters and reverb. “In many ways it does make performing easier,” says Antonio. Setting up Launchpad X layouts in r_cycle, he says, “gives me time to think about my performance, how I can make instruments and tools that respond best to how I work.”
“It's really useful to be able to sequence a pattern visually,” he says. “I can see at a glance what kind of beat or rhythm I've programmed and visualise what changes will sound like. There's also the other benefit of being able to play the tool quicker than if I was using a mouse and keyboard.” He says he’s using r_cycle and Pd for everything from rhythms to timbres produced by granular synthesis.
You can hear a recording of Antonio’s performance using r_cycle, Ableton Link, Carabiner, TidalCycles and Novation Launchpad X on Soundcloud here.
What’s Pd, and what makes it cool?
Pd, short for Pure Data, is a free and open source software construction kit for making your own multimedia tools. Instead of writing code by typing in text, you connect different modules, visually, with virtual patch cords. It’s akin to connecting hardware modules with cables; the same ideas have evolved in both hardware and software since the 1960s. Combining reusable components lets you build something more complex, quickly and reliably.
This “dataflow” approach is particularly suited to musical applications. Imagine a piano – you press a key, a mechanism inside produces sound. Or think of the wiring inside a drum machine, responding as you turn dials and press buttons, or the series of connections on a guitar effects pedalboard. These sorts of structures are easily represented as signal flow in music and sound.
Years of community support have given Pd some sophisticated sonic powers that you can use without needing to have previous experiencing in programming or signal processing math. It’s a great environment for learning and experimentation with synthesis, effects, and musical patterning – since you can’t really “break” anything, and it’s free of charge.
Miller Puckette, the lead developer of Pd, also created the first version of Max. The two tools accordingly share a lot of the same fundamental design principles and basic objects. Over the years, they’ve evolved to suit different use cases. Max is developed by Cycling ’74 as a commercial product for macOS and Windows, and has grown to include a massive number of objects and libraries, other code environments, and advanced features, including integration with Ableton Live.
Apart from being free, Pd uses a stricter set of objects, and runs on macOS, Windows, Linux, plus inexpensive hardware like Raspberry Pi. It’s also available as an embeddable environment called libpd which can be used on iOS, Android, and in game environments and custom software. The two communities overlap and frequently share ideas. But thanks to its free license and its ability to run on inexpensive hardware, Pd has a specific following in the live coding scene. There are special tools and distributions that make it easy to jam with others, in person or even over the Internet. Pd and r_cycle make a good combination, as you can share your creations with non-coders regardless of platform or license costs or run on tiny embedded hardware, without added costs.
Download Pd here.
How To Get Started In Pd
r_cycle requires a current version of Pd, so now is a good time to get caught up. You’ll find lots of resources for learning Pd and finding what others are doing at the community Pd hub.
But you can grab the latest Pd (0.50 or later minimum) on Miller Puckette’s personal site.
Pd is available from distributions like Raspbian on Raspberry Pi; Ubuntu Studio is an easy way to try Linux and Pd on desktop PCs. Just make certain that you have the minimum required version. Ubuntu Studio 20.04 comes with the compatible version of Pd pre-installed. You can also easily build from source if your distribution doesn’t have an up-to-date package; look for INSTALL.txt inside the source download. (Choose the source option on the site above.)
Let’s try some basics of patching so we get some sound and MIDI working. First, brace yourself – Pd is not the prettiest piece of graphical software around. On the upside, it’s an easy way to scare your friends and convince them that you’re using incredibly nerdy software. Mostly what it gives you at first is a blank window, which you can think of as a blank piece of paper.
Add Your First Objects
Choose File > New to start a new patch. To fill it up, check out the Put menu. Start by adding a Toggle. The cursor changes to let you drop a square box on the canvas. With it still selected, choose, Put > Object. Click inside that box, and type metro 500. The box will change from a dotted outline to a solid outline, showing Pd has recognised the name of a known object. (If it remains with a dotted outline, check you didn’t make a typo!)
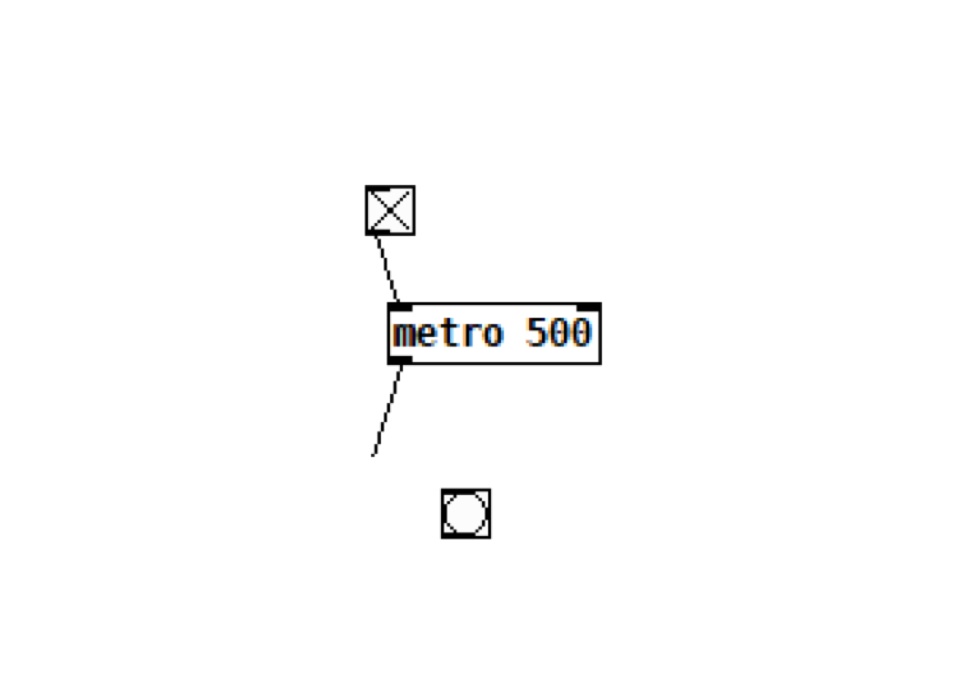
For testing purposes, we can build a simple Metronome with a 500ms pause between ticks.
Wire It Up
Look closely at the metro object. You’ll see small dark rectangles on the top and bottom. These are ports for connecting signal – “inlets” at the top are inputs, “outlets” on the bottom are outputs, like jacks on a synth module. You’ll use these inputs to connect various kinds of control and audio signal, and to input and output parameters. Pd will automatically connect your toggle to metro if you create the metro object while the toggle is still selected; if not, drag from the bottom of the toggle to the top of the metro. Lastly, choose Put > Bang, which lets you drop a square with a circle inside. Connect the metro to the Bang in the same way. Double check your connections match what’s shown in the image. You can drag around the objects to make space, then connect virtual patch cables by dragging from one object to the other (you’ll see the cursor change to a circle).
Turn It On
Finally, switch off ‘edit mode’ by press Ctrl-E (Cmd-E). Edit mode is intended for modifying your patch; switching it off makes it more convenient to interact with the patch by allowing you to select interface elements directly. You can now click the checkbox. You’ll see the bang start to blink. You’ve created the structure for a basic metronome. (Get it? “metro” is short for metronome; the 500 is a 500 millisecond pause between ticks.) It’s not terribly useful, but what you’ve got now also shows you how data flows in Pd. The “bang” represents a simple event in time – a message that you can use to make something else happen, which you could use to, say, trigger a high-hat.
Enable Audio & MIDI Connections
Now make sure Pd is working properly with your hardware. Under the Media menu, you’ll find the related settings — choose Media > Audio Settings and Media > MIDI Settings to configure chosen audio and MIDI interface. (On Windows and Linux, you can also select an audio driver model on the Media menu, like ASIO, MMIO, ALSA, or JACK, though generally, try the default first.)
In Media > MIDI settings, choose Novation Launchpad [model][MIDI port] for both input and output. Ignore the additional MIDI settings for now; you’ll only need them if you want to use a Launchpad Pro to sequence external MIDI gear. Make sure to hit OK (or at least Apply); closing the window doesn’t save settings.
Identifying The Correct Port
Your Launchpad will make multiple virtual ports available to the OS when you connect via USB, so you want to make sure you select the correct input and output. The first part of the identifier is the model number - so, for instance, the Launchpad Pro MK3 appears as LPProMK3. There’s a DAW input and output, which is intended for interaction with software like Ableton Live, and one or two sets of MIDI input and output, which is what we want to use for our custom programming.
Each Launchpad makes a DAW port available, and one or two MIDI ports. We want the MIDI ports - the DAW port is intended for interaction with software like Ableton Live, whereas the MIDI port is what we’ll use for programming.
On macOS, you’ll see labels for “DAW,” “MIDI,” and (for Launchpad Pro) “DIN.” You want MIDI - so for instance, for the Launchpad X, LPX MIDI for input and output.
On Windows, the operation is the same but the labels are slightly different. To connect via Windows, look for “MIDIIN 2” and “MIDIOUT 2.” (The model is listed after these, in parentheses.)
On Linux, choose [Device] MIDI 2 for both input and output. You’ll probably want to set ALSA as your MIDI system. (Note that additional ALSA setup may be required, as with any Linux software accessing MIDI devices.)
It’s best to connect the device, and then load Pd. If you don’t see your device, quit Pd, plug in again, and restart.
Testing, 1, 2…
Once you’ve selected your hardware, try it out via Media > Test Audio and MIDI. (The test dialog also automatically switches audio on; otherwise, you have to select Media > DSP On, or you won’t hear sound!) The test tones are an easy way to check sound, and tapping on your Launchpad will light the bang below MIDI IN.
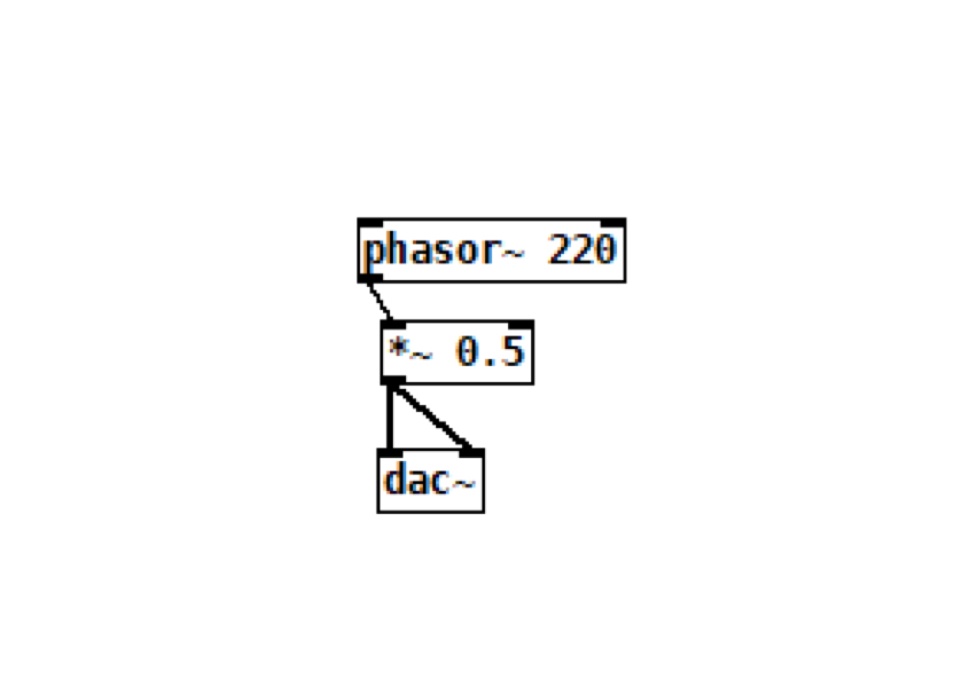
You can also make your own test patch. For sound, try connecting a test oscillator. So far, everything we’ve done has been at control rate — processing signals like numbers, events, and MIDI. For sound, we’ll be outputting signal at the resolution of the audio interface, so most likely 44,100 times per second. These objects have a tilde character at the end – not because we’re suddenly Spanish, but rather that it looks sort of like a sine wave (~). To create a sawtooth wave at 220 Hz, we will enter phasor~ 220, then connect that to the audio output (dac~, for digital-analog converter, but here meaning your speakers or headphones). Enter *~ 0.5 as an object after the phasor~ before connecting it to the output, cutting the amplitude in half so as not to hurt your ears.
To get the Launchpad in on the action, try routing some MIDI input. Create a notein object to take MIDI note events from all connected MIDI interfaces. Connect that to a number box (Put > Number or Ctrl/Cmd-3). Assuming you selected the Launchpad correctly, now if you select Note on the top of your Launchpad and start pressing pads, you should see MIDI note numbers appear in the note box.
Convert MIDI Notes To Frequency
We’re far from the r_cycle API at this point, but we can very quickly employ our Launchpad in a really basic test patch. You could connect the number directly to the first inlet of phasor~, but you’d get very low frequencies. Instead, convert MIDI note numbers to the frequency scale by adding an mtof object in between – that’s short for “MIDI to frequency.” (You can add another number box if you choose, to see what the frequencies look like. You’re swapping a linear scale, the MIDI integers, for a logarithmic scale in frequencies, as this is roughly closer to how we hear – and how our standard tuning works.)
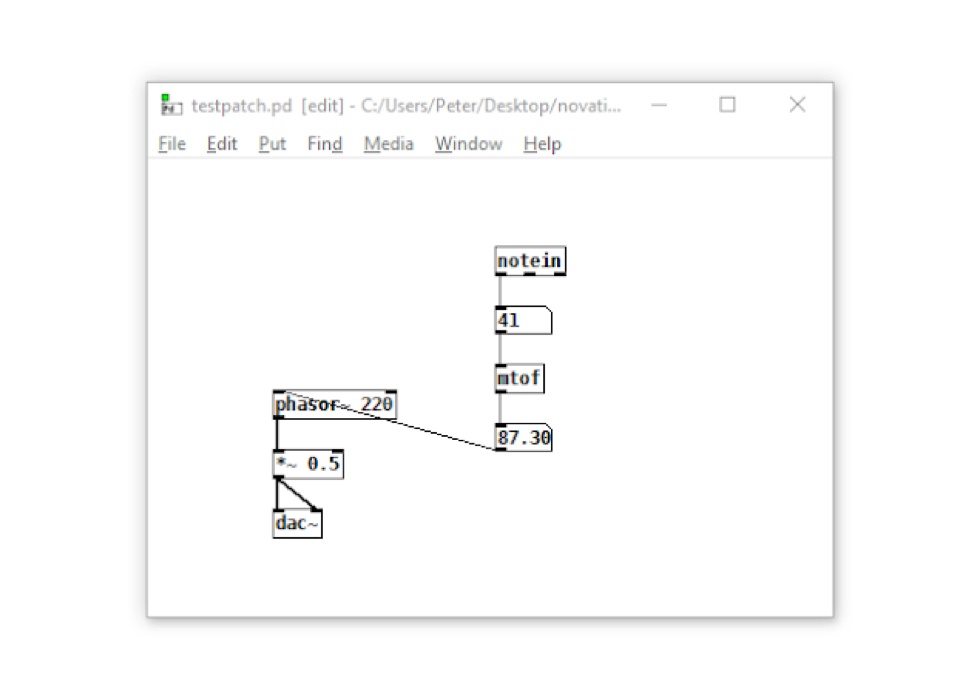
Okay, it’s a pretty crude synth, but in just a few moves, you can now play pitches on the phasor oscillator with the Launchpad. With a little practice, you’d hook something like this up in a matter of seconds — even as a beginner — and then can build something more sophisticated from this starting point. And the r_cycle API will save you still more time.
Finding Help Inside Pd
With this patch still open, we can pull up a couple of key tips. First, you can quickly find help inside Pd. Right-click (ctrl-click on Mac) any object, and choose Help. This will display complete descriptions of any objects — and it’s a patch, meaning you can edit or copy-paste examples right into your own patch.
Useful descriptive dialogue is displayed using the Help feature on each object.
Learn Step By Step
You can also find a basic tutorial manual under the Help menu. Choose Help > HTML Manual for assistance in your browser, or Help > Browser to bring up example patches. (Click Pure Data for most of the examples, though you’ll also probably enjoy fiddle~ for pitch tracking, loop~ for a looper, and rev3~ help for a particularly lovely-sounding reverb).
See Which Objects Are Available
Of course, usually your first hurdle is just working out where to begin, and which objects to add to that blank screen. Choose Help > List of objects to browse by category.
There’s no browser in Pd’s ultra-minimalist interface, but you can install an optional plug-in for auto-completing object names. Choose Help > Find externals, type in “completion-plugin” in the search box, and select the newest release. After you restart, you can auto-complete objects by pressing TAB as you type. (Full instructions here.)
(These two techniques may help users familiar with Max to get more comfortable, especially since some objects match up between the two environments, whereas others don’t.)
Also, if you don’t like your Pd patch looking messy, select part or all of your objects (drag across the patch or choose ctrl/cmd-A to select all), and select Edit > Tidy Up. This will line up your patch better, which makes it easier to read.
Download r_cycle here.
Meet r_cycle
The r_cycle library gives you a set of tools to easily interact with your Launchpad’s pads, lights, and interface functions. It lets you seamlessly work with your hardware as an extension of your software ideas in Pd. You’ll need a compatible device: Launchpad MK2, Launchpad X, Launchpad Mini MK3, and Launchpad Pro or Launchpad Pro MK3 will all work. And other than that, you just need the Pd software. In fact, you can even start playing with some useful examples right away.
The magic of working with r_cycle is about acting with interface elements instead of having to think, one at a time, about buttons and lights. That lets you construct musical applications more quickly. So instead of a bunch of manual work, you can add whole widgets that perform musical tasks.
You’ll find detailed documentation in the r_cycle package, but here’s an overview.
There are objects that deal with large-scale interface:
LP_GUI object, which interacts with the Launchpad’s display engine
DRUM_PADS, for making a grid of drums (or other on/off triggers)
KEYBOARD, which produces a chromatic keyboard
Then you can also control pads in different ways:
BUTTON, setting pads to on/off triggers
RADIO, which let pads select different modes (what’s called a radio switch in UI design), or a slider (like a fader)
GRID, which sets a set of pads or buttons as a programmable step sequencer
Of course, sometimes you do want to use your Launchpad as a more traditional MIDI controller input, but there are also objects pre-designed to make that easier, too. TO_ and FROM_ objects let you take note, velocity, and aftertouch (depending on which Launchpad you have) as inputs, or set RGB values of the LEDs and flash lights as outputs.You caneven do some basic displaying of text.
You could stop there and simply use r_cycle and Pd as a control layer between the Launchpad and other sound making software. But since Pd also has powerful sound processing and generation tools itself, you might stay inside the Pd environment, and r_cycle also has some tools to help you with that.
r_cycle includes custom sound objects that help you quickly construct useful stuff in Pd. Of course, Pd being an open-ended environment, you could also use other sub-patches, Pd objects, Pd externals (third-party Pd objects), and your own creations. R_cycle gives you just an extra boost with some ready-to-use, ready-to-modify instruments to incorporate into your own patches, including:
SIMPLE_PLAYER and MULTI_SAMPLER sample playback devices
TAPE_DELAY effect
OSCILLOSCOPE
BAND_LIMITED monosynth (just a very basic 1-oscillator synth starter you could incorporate into more complex designs if you so choose)
G_SYNTH granular module
WAVESHAPER distortion
EU_R and PATTERN quasi-Euclidean rhythm generator and pattern generators, respectively
There are lots of additional utilities for envelope generation, handling clock values, RGB parameters, and other timesavers, too.
You might also have a look at rjlib, a similar free and open source library containing more synths, effects, and utilities. Combining the two can produce some really powerful instruments, pattern makers, and sound processing. And it means you actually have to do very little patching yourself, though these are also a great way to learn. https://github.com/rjdj/rjlib
Where To Go Next
An important feature of Pd is that it’s extensible. A lot of functionality can be added simply by downloading other patches and sub-patches, and incorporating them into your work. Basic Pd files are stored as text, meaning it’s common practice to post entire patches as text dumps and just copy-paste them into the software.
Pd also supports externals, which allow developers to make their own objects in C++. Getting these to run used to be a chore, particularly across OSes, but recent versions of Pd have incorporated their own package manager called Deken. To translate that into plain English, you can now find an external you need and install it automatically. A great example of that which you’ll want to check out is Ableton’s Link technology. This allows you to easily sync your Pd patch with other software, including Live, Reason, iOS apps, and more. To install it, choose Help > Find externals, and enter abl_link~ to pull up the Link external.
Note: deken builds for each individual platform. As of this writing, abl_link~ supports embedded use on iOS and Android, and macOS and Linux. Windows support is experimental and doesn’t currently appear to work on 64-bit Windows, but you can install the 32-bit Pd and run that alongside the 64-bit version. (Run both installers, and each will maintain its own compiled externals; then launch the one you need for compatibility.)
Further Information
If you’ve got through this and you’re thirsty for more information to take you to the next step of your Pd journey, you’ll find two excellent step-by-step guides to Pd, in addition to what’s in the online help:
https://flossmanuals.net/pure-data/
http://pd-tutorial.com [also in German and Spanish]
For live coding and hacker culture, the biggest hub is TOPLAP. There’s a text code-based bent, but still a decent-sized Pd community: https://toplap.org
For Pd specifically, netpd is both a set of free Pd tools for online, synced-up jamming (worldwide, not just locally), and a community of people organising jam sessions: https://www.netpd.org/
Reading material:
https://cdm.link/2015/07/hack-grid-novation-releasing-launchpad-pro-firmware-open-source/